Загрузка видео...

Не удалось загрузить видео

На главную

What started as building a personal taste.md skill for myself, turned into building a pipeline to create any taste as a skill. The most important piece is references. This is where you should spend time. If the references suck, so does the skill. I find that references cropped tightly...

61,019 просмотров • 4 месяцев назад •via X (Twitter)

Комментарии: 41

Фото профиля Jaytel
Jaytel4 месяцев назад

Connect your OpenRouter account and try it here or clone the repo and run it locally with your own keys

Фото профиля Druids
Druids4 месяцев назад

I do something similar, the difference is I manually annotate the things I like on each reference before feeding to the skill.

Фото профиля Jaytel
Jaytel4 месяцев назад

Yeah that’d probably help here too

Фото профиля Mete Polat
Mete Polat4 месяцев назад

Dude this is super interesting, thanks for sharing the breakdown. I’m actually planning to write next weeks’s newsletter issue on the need to start collecting more references outside of text and this fits in nicely. 2 questions for you - 1. do you feel like it actually deducts correctly *why* you like something or what makes it good? You mention the “why the reference is successful” but it doesn’t seem like you actually tell it yourself why it’s significant to you? 2. do you feel like this has the potential to broadly capture your taste or is it more about finding a “local valley” in the model’s style that’s aligned with the particular references you provided (and so it’s more like style presets you can tune and switch between vs a larger overarching taste)

Фото профиля Jaytel
Jaytel4 месяцев назад

When you ask it to identify why it’s successful and ignore the function of the reference- it is surprisingly close to what I would say about each reference myself. I think you need to do this for each general aesthetic you’re looking for. Not broadly my complete taste as a whole

Фото профиля Mete Polat
Mete Polat4 месяцев назад

Makes sense. Thanks for elaborating

Фото профиля Farhan
Farhan4 месяцев назад

this is awesome! thanks for sharing. I tested with one sample and tested on both opus 4.7 and gpt 5.5 and results are amazing. I created reference sets so i can work on targeted taste experiments. 1 - local ui wrapper 2 - reference and results

Фото профиля Raffi
Raffi4 месяцев назад

Another banger

Фото профиля Jaytel
Jaytel4 месяцев назад

🫶🏼

Фото профиля Pratham
Pratham4 месяцев назад

that's lowkey genius af, thanks for making this 🫡

Фото профиля isle of echo
isle of echo4 месяцев назад

Super cool! I’m exploring something similar with Claude skills right now! trying to build a system/infrastructure that help anyone transform their taste / aesthetic into something can be understood, executed by AI for future projects and interfaces.

Фото профиля Josiah Gulden
Josiah Gulden4 месяцев назад

🔥 this is great for static refs, but one of the roadblocks I’ve hit in similar experiments is that motion is a big part of why I like what I like and none of the leading vision models can see video. hi-res, HFR sequences are usually too big for the context window. any tips?

Фото профиля Jaytel
Jaytel4 месяцев назад

there’s a few skills that help. @emilkowalski has a good one but overall still have to spend time finessing motion in general with the models

Фото профиля Jon Moore
Jon Moore4 месяцев назад

Better yet, use the Mobbin MCP server and give it thousands of references. Cool idea!

Фото профиля Shane Levine
Shane Levine4 месяцев назад

this is very cool

Фото профиля Michelle Fitzpatrick
Michelle Fitzpatrick4 месяцев назад

Curious what differences Opus and GPT notice? Is there much duplication from their analysis ?

Фото профиля Jaytel
Jaytel4 месяцев назад

They both find different things GPT seems to do better from a traditional design perspective

Фото профиля henry
henry4 месяцев назад

this is so cool!

Фото профиля Wikman
Wikman4 месяцев назад

Super great @Jaytel - love this space. We have done a similar thing for design systems that keeps enterprise styles consistent across. Will try this one 👊

Фото профиля Brotzky
Brotzky4 месяцев назад

super interesting stuff

Фото профиля Lucas Bacic
Lucas Bacic4 месяцев назад

Tried something similar (nowhere near that scale), pushing the model to use semiotics as its lens. Adds real depth beyond pure form.

Фото профиля Hemali Tanna
Hemali Tanna4 месяцев назад

Loved it! Starting with those aesthetics can save so much time and tokens!

Фото профиля J 👋
J 👋4 месяцев назад

Super cool, will give this a go today.

Фото профиля cam
cam4 месяцев назад

gonna try this 🫡

Фото профиля Cog_
Cog_4 месяцев назад

Brilliant!

Фото профиля Nadine | HealthTech Designer & Developer
Nadine | HealthTech Designer & Developer4 месяцев назад

This is so smart, great explanation too thank you 🙌

Фото профиля Bruno Pardo
Bruno Pardo4 месяцев назад

Love it, thank you so much for sharing. I will try to connect it directly to the Arena API instead and see if I can make it work that way as well, could be quite powerful!

Фото профиля Fazal
Fazal4 месяцев назад

Very interesting workflow, and if you are using Pi gotta try

Фото профиля Noah Wainwright
Noah Wainwright4 месяцев назад

Incredible

Фото профиля betts
betts4 месяцев назад

thank you for your work this is amazing

Фото профиля John Allen
John Allen4 месяцев назад

this is dope

Фото профиля Rahul Singh Bhadoriya
Rahul Singh Bhadoriya4 месяцев назад

Super intresting, I was thinking on this problem, loved the same image multiple times model call thing

Фото профиля Emily Ritter
Emily Ritter4 месяцев назад

Really nice design! Well done

Фото профиля Built by APE | Austin Product Engineering
Built by APE | Austin Product Engineering4 месяцев назад

Any more effective than “make it sexy?”

Фото профиля Jaytel
Jaytel4 месяцев назад

skill + “make it sexy” ?

Фото профиля Kriss Patel
Kriss Patel4 месяцев назад

Interesting, I am doing this the other way around, where I am feeding the model all the principles about different styles and building a skill from it so it can refer to it.

Фото профиля Almeida
Almeida4 месяцев назад

Nicee!

Фото профиля Arslan Iqbal
Arslan Iqbal4 месяцев назад

Multi-model analysis + chunking = surprisingly scalable design system.

Фото профиля Shellie Hu
Shellie Hu4 месяцев назад

This is super inspiring! Do you envision the skill evolves as your personal tastes change? How would the files capture that?

Фото профиля Farshad Taheri
Farshad Taheri4 месяцев назад

This is cool. Have you tried fine tune a model for this?

Фото профиля J 👋
J 👋4 месяцев назад

Hey, @Jaytel been playing w. this a bit. Only one model fired in my trial but still got a result. I made some tweaks that maybe are stearing things in the wrong way. It feels more like forced application of images refs rather than an interpretation of an overall aesthetic 🤔.

Похожие видео

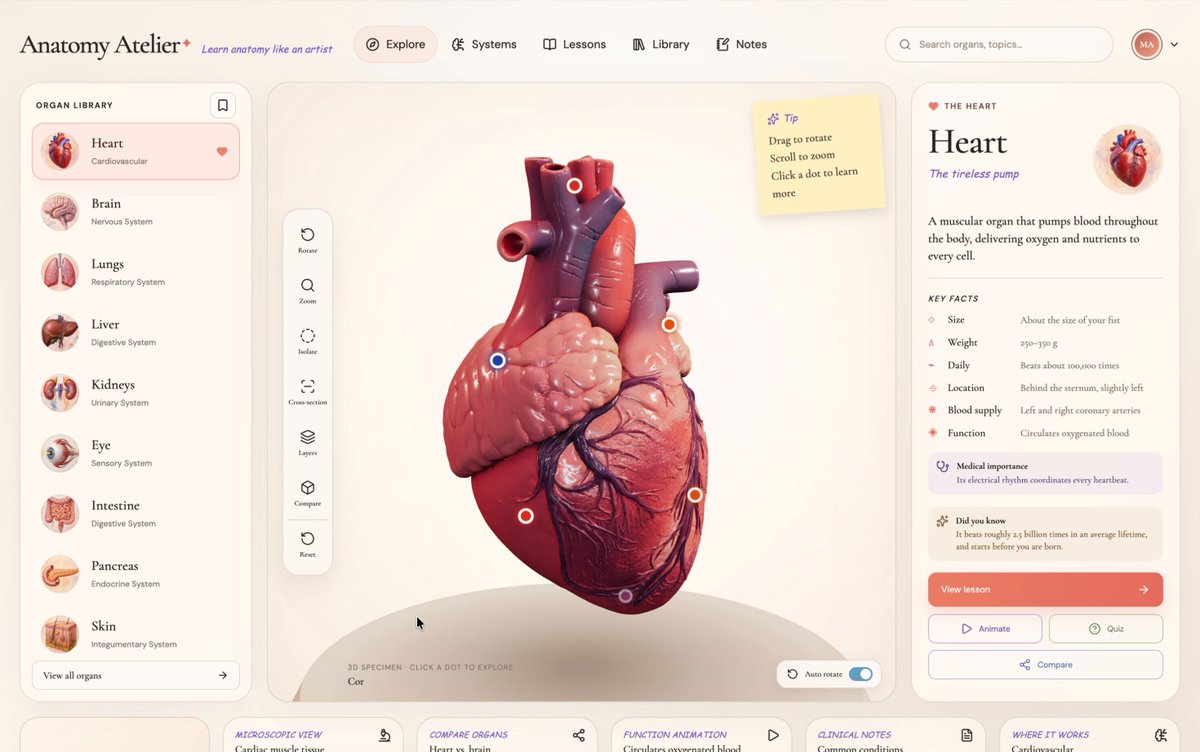
Only if education could be this interactive ❤️‍🔥 I've had a looong wish to build something genuinely useful through vibe coding, and I finally did it. A 3D human anatomy application built with Three.js using GPT 5.6 Sol. It all started with a single design image that I created using GPT Image 2.0. I then used it to generate every 3D organ image, one by one. Next, I converted each of those images into 3D models using Tripo (and no, they didn't sponsor this 😄). After that, I opened Codex, wrote a master prompt based on the design, and gave it the prompt, the design image, and all the 3D models. Codex built the first version beautifully, but there was one big problem. Every single 3D model was nearly 120-150 MB. That obviously wasn't practical for the web and was giving a performance of 16fps. After a few iterations, Codex optimized each model down to roughly 2–5.5 MB while preserving the visual quality, reducing the total asset size from ~900 MB to just 28.6 MB. And each model loads on demand. Along the way, Codex also generated those anatomical illustrations showing where each organ sits in the human body, and even created the interactive hotspot markers that explain different parts of every organ. It handled all of that. The process wasn't exactly one shot, but it also wasn't difficult. You just have to do it step by step. It genuinely felt like building something that could make learning anatomy much more engaging. The inspiration came from Dilum Sanjaya's 3D animal plant cell project. I remember seeing it and thinking, "I want to build something like this one day." And I did it :D Live: Code:

The Bugged Dev

2,115,895 просмотров • 2 месяцев назад

THIS IS HOW A $10K/MONTH PRODUCT CONTENT PIPELINE GETS BUILT FROM 1 REFERENCE IMAGE AND A JSON PROMPT The video is not about "better prompting." It is a very simple cheat code: find an image with the exact lighting, color grade and camera feel you want, make AI reverse-engineer the style into a detailed JSON, then feed that structure into Nano Banana Pro with your own product. That is the part people keep missing. They write vague prompts like “make it realistic” and blame the model when it produces plastic garbage. The better workflow gives the model a style contract before asking for the final image. One reference image becomes the art director. The JSON becomes the brief. Your product becomes the asset dropped into a visual language that already works. This is how a solo operator can sell 20-30 "premium" product shots a week without owning a camera, renting a studio or touching a lighting rig. At $150-$300 per image, that is a $3K -$9K/week offer if you can bring clients. Not guaranteed. But the math is why this workflow matters. The article is the same business model underneath: AI output gets valuable when you stop asking for random generation and start building reusable instructions that copy proven formats. No photographer, no studio, no lighting setup, no retoucher, no 12-round creative call. Just reference, extraction, structure and execution. The prompt does not make the photo look expensive. The stolen style system does.

Nekt0

14,833 просмотров • 4 месяцев назад

All these demo videos make HEAD SWAPPING with Nano Banana look so easy, but then you give it a try and you're like... uh... what? Why didn't that work? Here's what I've found. Nano Banana reads your image, almost literally, so if you write on the image, it reads the text. This is how Higgsfield AI 🧩 has capitalized on the tech: "Write on the image" and give it direction, right? Totally true, but you don't need Higgi to write on your image. Nano Banana will understand your direction regardless of where you write on your image. On one hand, Higgi is really smart, because they're hranessing the tech in a unique way, but the whole "Higgsfield's Banana Placement" is a bit of a misnomer. It's more of a "Banana Placement" and Higgi is just giving you a sort of basic Photoshop-type tool to work with (again, pretty smart), but the real tech is the Banana. 🍌 This is how I head swapped heads in Runway, but Nano Banana maintains the aesthetic qualities of your image almost perfectly, whereas Runway Reference spits out a very Gen-4 looking image. I like using Nano in Freepik (now Magnific), mainly because it's fast and I can get 4 gens at a time, and you need to gen a dozen times of so before you get a winner (most of the time). I was pumped when I saw Freepik introduce the @ reference feature, just like Runway has, but it doesn't seem to work for head swapping. My guess is because that's not really how Nano Banana tech works... ideally. Marco is the person I saw using this "A" and "B" method, back when Nano was on LM Arena, and man-oh-man, it just works... like a charm. You need experiment with how much of the face you blot out, and the angle and facial expression of your new head if you want the blend to be perfect. All of the results in this video are 100% Nano Banana. I did not do any Photoshop work to the images after the fact. I really hope this helps. Let me know if you have any questions. I'm happy to help. And I'll keep posting videos like this if you guys find them useful. Let me know! And if you want more serious, one-on-one AI consultation you can throw something on the books here:

Jordan Daniel Chesney

62,235 просмотров • 1 год назад

this video is the CLEAREST explanation of how claude skills + AI agents work and how to use them most people set up an AI agent and wonder why it keeps disappointing them. the context window is everything context is what the model assembles before it takes any action. think of it like everything the agent needs to read before it does anything. the quality of what goes in determines the quality of what comes out. the models are genuinely really good right now. claude and gpt are exceptional. the variable is almost always the context you give them. 1. agent.md files are mostly unnecessary every single line you put in an agent.md file gets added to every single conversation you have with your agent. a 1000 line file is around 7000 tokens burning on every run. the model already knows to use react. it can read your codebase. save the agent.md for proprietary information specific to your company that the model genuinely cannot know on its own. 2. skills are the actual unlock a skill.md file works differently. what loads into context is only the name and description, around 50 tokens. the full instructions only appear when the agent recognizes it needs that skill. so instead of 7000 tokens on every run you have 50. and the agent stays sharp because the context window stays lean. the closer you get to filling the context window the worse the agent performs, same way you perform worse when someone dumps 10 things on you at once. 3. here is how to actually build a skill the right way most people identify a workflow and immediately try to write the skill. what you want to do instead is run the workflow by hand with the agent first. walk it through every single step. tell it what to check, what good looks like, what bad looks like. correct it in real time. once you have had a full successful run from start to finish, tell the agent to review everything it just did and write the skill itself. it writes a better skill than you will because it has the full context of what actually worked in practice not in theory. 4. recursively building skills is how you go from frustrated to reliable when the skill breaks, and it will break, ask the agent exactly why it failed. it will tell you specifically what went wrong. fix it together in that same conversation. then tell it to update the skill file so that failure mode never happens again. ross mike did this five times with his youtube report generator. it now pulls from eight different data sources and runs flawlessly every single time without him touching it. 5. sub agents are something you earn not something you set up on day one start with one agent. build one workflow. turn it into one skill. once that works add another. ross mike has five sub agents now covering marketing, business, personal and more. it took months to get there and every single one exists because a workflow proved it deserved to exist. the people who set up 15 sub agents on day one and wonder why nothing works skipped all the steps that make the thing actually run. 6. your workflow is the thing the model cannot get anywhere else the model has been trained on everything. it knows more than you about most things. what it does not have is your specific process, your taste, your way of doing things. that is what skills capture. that is what makes your agent actually useful versus a generic one. downloading someone else's skill means downloading their context onto your setup and it will not work the way you want it to because it was never built around how you work. this is the clearest explanation of how agents actually work i have heard. Micky runs this stuff every single day and the results show it. full episode is now live on The Startup Ideas Podcast (SIP) 🧃 where you get your pods people charge for this sorta stuff i give away the sauce for free i just want you to win watch

GREG ISENBERG

194,524 просмотров • 6 месяцев назад

CLIP by hand ✍️ ~ 13 steps walkthrough below CLIP, Contrastive Language-Image Pre-training, is OpenAI's answer to a question that sounds impossible: how do you put a sentence and a picture in the same space? CLIP shipped when OpenAI was still open, and those embeddings were shared far and wide. Almost every multimodal model you use today descends from them. How does it work? Goal: learn one shared embedding space for text and images. = 1. Given = A mini batch of three text-image pairs. OpenAI trained the original on 400 million. = 2. Text to vectors = Let us look up each word with word2vec. = 3. Image to vectors = We cut each image into two patches and flatten them. Now text and pixels are both just numbers. = 4. The other pairs = Repeat steps 2 and 3 for the rest of the batch. = 5. Encode = Let us push both sides through their encoders, a linear layer and a ReLU. In practice these are transformers, but the shape of the operation is the same. = 6. Mean pooling = We average across the columns, so each image and each sentence collapses to a single vector. = 7. Projection = The text vectors are 3D and the image vectors are 4D, so they cannot be compared at all. A linear layer projects both to 2D. That 2D space is the shared embedding space, and getting here is the whole point of the model. = 8. Prepare for matmul = Let us copy the text vectors down and the transposed image vectors across. = 9. MatMul = We multiply, which takes the dot product of every text vector with every image vector. Each cell is one estimate of how well a sentence matches a picture. = 10. Softmax, e to the power = Raise e to each cell. To keep it hand sized we approximate e with 3. = 11. Softmax, sum = Sum each row for image to text, each column for text to image. = 12. Softmax, normalize = Divide, and out come two similarity matrices, one per direction. = 13. Loss gradients = The targets are identity matrices: a pair that belongs together should score 1, every other cell 0. Subtract the target from the similarity and you have the gradients, in both directions. The takeaway: pairing a picture with a sentence comes down to a single dot product. Everything before step 9 is the work of getting them into one shared space, so that the dot product finally means something. 💾 Save this post!

Tom Yeh

20,929 просмотров • 2 месяцев назад

how to use Google's NEW open source Design.md + AI Skills to make your startup look like a $100 million company in 1 hour: 1. Design.md is an open source file from Google that captures the soul of a design. Typography, colors, spacing, all in one markdown file. You attach it to your prompt and your agent builds beautiful things every time. 2. Think of it this way. The HTML is the finished dish. The design.md is the recipe. The skills are the ingredients. Put them together and everything you build looks consistent and professional. 3. Don't create a design system from scratch. Find a brand you love. Linear, Stripe, Vercel, whatever resonates. Study it. Use ChatGPT or Claude to help you extract the design language into your own design.md file. 4. Build skills on top of your design.md. A landing page skill. A mobile app skill. A motion design skill. A slide deck skill. Each one references the same design.md so everything looks like it came from the same designer. 5. The biggest mistake people make: they nail one screen and then everything else looks generic. Design.md solves this. One file keeps every page, every format, every medium consistent. 6. Use it across everything. Your landing page. Your app. Your pitch deck. Your promo videos. Same DNA. Same taste. Same system. That's what separates a startup that looks real from one that looks vibe-coded. 7. Build a second brain for design inspiration. When you see something beautiful in the real world or online, capture it. Save it. When you're building something new, reference it. Taste is developed, not downloaded. 8. It's obvious but the difference between a product people trust and a product people bounce from is how it looks and feels. Design.md gives you that edge. you can watch below shoutout to Meng To for coming on The Startup Ideas Podcast (SIP) 🧃 and walking through his full workflow. if you want to use AI to actually build gorgeous designs, you'll want to use see this. watch

GREG ISENBERG

512,753 просмотров • 5 месяцев назад

A transformer can learn not just the outcomes of dynamics, but the operator that executes the rules. To show this we trained a transformer on roughly 0.04% of a discrete rule space - 100 of 262,144 possible rules - and it learned to apply unseen rules from the same rule class. The model does not simply memorize specific rules. It learns the operator that maps a supplied rule plus an initial state, including unseen rules from this class, to the correct next state. This is relevant because it is a shift from “neural networks approximate dynamics” to “neural networks can learn to execute symbolic programs within a defined rule class”. The rule itself is supplied at inference time, as data, and the network has internalized how rules act, not which rules to apply. On previously unseen rules, the model achieves 98.5% perfect one-step forecasts and reconstructs governing rules with up to 96% functional accuracy. Two results make this hold up under scrutiny. First, inductive bias decay. As we scaled training rule diversity, the correlation between functional inference accuracy and distance-from-nearest-training-rule collapsed to R² = 0.00. At the largest tested training-rule diversity, the model’s performance on a new rule shows no measurable dependence on how similar that rule is to anything it was trained on. The bias toward training data (the thing we worry most about in compositional generalization claims) is something we can measure decaying, and we find that at scale it is gone. Second, an identifiability theory. We derive a closed-form expression for the number of rules consistent with a single observation. This reframes the inverse problem: failure to recover ground truth is not necessarily a model defect, but can be correct behavior when the data underdetermine the rule. The model is sampling the equivalence class; and identifiability is governed by coverage, not capacity. The methodological move underneath both results is amortization. Classical work on rule inference (e.g. the Santa Fe EVCA program, evolutionary search over CA rule space) was per-instance: search the rule space for each new system. We replace that with a single forward pass of a transformer trained across many instantiations of the rule class. That is what makes symbolic rule inference scalable as a research direction rather than a curiosity. We show that this works in a tightly constrained domain: binary, deterministic, local cellular automata on small grids. The locality-break experiment shows the model fails sharply when target systems violate its structural priors (which is itself a useful diagnostic, but it bounds the operator class). We don't yet know how this scales to multistate, higher-dimensional, or stochastic CA, or whether it transfers cleanly to non-CA systems whose coarse-grained dynamics admit local surrogates. The identifiability framework - what can be inferred from observation, given a hypothesis class - should transfer wherever finite local rules meet sparse data. The amortization argument transfers wherever per-instance symbolic search has been the bottleneck. Those are the pieces I expect to outlive the cellular automata setting. Led by Jaime Berkovich with Noah David, at LAMM@MIT. Out now in Advanced Science Advanced Portfolio (link to paper & code below).

Markus J. Buehler

39,245 просмотров • 5 месяцев назад