Loading video...

Video Failed to Load

Go Home

Incomplete documentation leads to costly rework. Virtual Walkthrough captures high-res photos during scanning & integrates them directly into your 3D model. Read labels. Spot details. Verify remotely. Available now on Biz & Enterprise. Book a demo:

20,219 views • 9 months ago •via X (Twitter)

0 Comments

No comments available

Comments from the original post will appear here

Related Videos

Want to create an avatar from a single image? FlexAvatar is a transformer model that creates full 360°, high-quality, and expressive 3D head avatar from just a single portrait image in minutes. Real-time Demo: FlexAvatar's lightweight architecture allows both animation and rendering in real-time, enabling interactive user experiences. To create a new 3D head avatar, only one image is required, e.g., from a webcam. The final avatar is ready after 2 minutes. Architecture: Under the hood, FlexAvatar adopts a transformer-based encoder-decoder design. The encoder maps the input image onto a latent avatar space, while the decoder produces 3D Gaussian attribute maps by incorporating the animation signal via cross-attention. The model learns all facial animations directly from the data without relying on pre-built 3D face models. This equips the avatars with realistic facial expressions. The internal avatar latent space can be conveniently used to integrate additional observations of a person via fitting. This enables use-cases where more than one image of a person is available, e.g., from a phone scan of the person. We train jointly on 2D monocular videos and multi-view data. However, in monocular videos, the animation signal leaks the target viewpoint, causing the model to produce incomplete 3D heads. We call this phenomenon entanglement of driving signal and target viewpoint. To prevent entanglement, we introduce bias sinks. These are learnable tokens that indicate whether a training sample stems from a monocular or a multi-view dataset. During training, the model learns to produce incomplete 3D heads only when the monocular token is present. During inference, FlexAvatar then always uses the multi-view token for which the model has learned to produce complete 3D heads. This simple design allows to combine the generalizability from monocular data with the quality of multi-view data. FlexAvatar summary: - Input: Single-image, phone scan, or monocular video - Output: Full 360° head avatar - Expressive animations - Real-time rendering and animation - Generalization to any portrait - Create a new avatar in 2 minutes - Use bias sinks to combine 2D and 3D data 🏠 🌍 🎥 Great work by Tobias Kirschstein and Simon Giebenhain!

Matthias Niessner

95,991 views • 7 months ago

HE MAKES MONEY IN REAL ESTATE WITHOUT BUYING, SELLING, OR EVEN SEEING A SINGLE HOUSE. HERE'S THE EXACT SETUP He never owns a property. He takes a single listing, turns it into a polished 30-second video, and sells that to the agent who posted it. Realtors need video for their feeds and almost none of them can make it. He sits in the middle and builds the whole thing once as a skill that runs on command Here is the exact process: 1. Pull the listing. Go to Zillow, open any listing, download the high-res images, and grab the property info. That is your raw material 2. Turn photos into video with Google Veo. Get a Google API key for Veo, the image-to-video model. It takes the listing photos and animates them into clean 30-second footage. This is the best one out right now 3. Add the voice with ElevenLabs. Get an ElevenLabs API key. Feed it the listing details and it returns a voiceover that sounds like a real human, not a robot. Lay it over the video with the text on screen 4. Send it with AgentMail. Get an AgentMail key so the system can send the finished email out on its own Then you wire it into one skill. Scrape the listing, send images to Veo, add the ElevenLabs voiceover and on-screen text, then send the email. Feed it each key one at a time and have it build each step Who you sell to: Pull realtors off Zillow and Realtor com whose listings have flat photos and zero video. That gap is your pitch. Send a free sample made from their own listing first, then charge a monthly rate for ongoing clips. One agent with ten listings is a recurring client, fully online Bookmark this

Yarchi

106,174 views • 2 months ago

MCP is an absolute game-changer. (Together with DeepSeek, MCP is probably the hottest thing in AI over the last 6 months.) I use Cursor to write code 90% of the time. I built an MCP server to connect the Cursor agent to GroundX, an open-source RAG system, and I'm not going back. This is officially insane! Here is what I did, step by step: First, a little bit of context. I maintain an end-to-end Machine Learning System with several pipelines to process data, train, evaluate, register, deploy, and monitor a model. I've written a lot of documentation explaining how the system works and how to modify and maintain it. There's also the documentation of the few libraries I used to build the system. I'm a massive fan of GroundX, an open-source enterprise-grade RAG system you can run on your servers or deploy to any cloud provider. I've been working with them for a long time. GroundX offers two services. First, the "ingest" service uses a custom, pretrained vision model to ingest and understand your data. I used this to process all the documentation I have for my code. Markdown files, source code, HTML files, and even PDF documents. Everything I've written related to my project went into GroundX. Their second service is "search," which combines text and vector search with a fine-tuned re-ranker model to retrieve information from the data. I needed to connect Cursor with this service, and that's where MCP came in. I built an MCP server with two tools: 1. The first tool would go to GroundX and retrieve the available topics. Splitting the data into topics (or "buckets," as GroundX calls them) allows me to use the same setup to serve documentation from different topics. 2. The second tool would search GroundX under a specific topic for the context related to the supplied query. The magic happens after connecting the MCP server with Cursor. Now, I can ask any questions related to my project, and Cursor's AI agent retrieves the list of available topics from the RAG system and then searches it to provide relevant context to the model. I went from getting mediocre, sometimes wrong answers to 100% truthful, complete answers. Here is the crazy part:

Santiago

255,521 views • 1 year ago

Last year, during tax season. I had 50+ receipts. Some in my email. Some on WhatsApp. Some in my gallery. And a few, I couldn’t even remember where I saved them. What should’ve taken a few hours turned into late nights, frustration, and second-guessing everything. Because the real problem isn’t filing taxes. It’s this: → Collecting documents → Organizing them → Verifying if everything is correct That’s where most people struggle. This year, I tried something different. Instead of chasing files everywhere, I built a simple, clean system using Wondershare PDFelement. And honestly, it changed everything. Here’s how my workflow looked. I started by scanning all my paper receipts directly from my phone using the Receipt Assistant. No manual typing. No guesswork. It automatically extracted details like: • Merchant • Date • Amount • Taxes Everything turned into searchable PDFs instantly. Then came the best part. All files were automatically saved to the cloud. So, I could: → Scan on mobile → Manage on desktop → Access everything, anytime No more “where did I save that?” moments. But what impressed me most. Every extracted detail is traceable. I could click any number and instantly jump back to the exact spot in the original receipt. No more cross-checking line by line. And when it was time to organize everything. • Exported all data into Excel → full expense overview • Merged multiple files into one clean PDF • Edited tax documents directly (no extra tools needed) Before final submission, I used: • AI Assistant → to summarize & cross-check documents • Smart Redact → to hide sensitive information Everything felt controlled, clean, and secure. That’s when it hit me: A good tax system isn’t about working harder. It’s about having a clear, traceable workflow that removes chaos. Suppose your files are still scattered across folders, emails, and screenshots. That is exactly why tax season feels exhausting. Search Wondershare PDFelement and try it free → #wondersharepdfelement #pdfelement #FileWithPDFelement #TaxSeason

Vikas Singh

11,795 views • 3 months ago

Introducing Neural Capture Version 2 on CorOS 3.3.0 and NanOS 2.2.0 - available now! Neural Capture Version 2 is a new cloud-trained version of Neural Capture that delivers higher resolution, greater realism, and improved dynamic response. By shifting the training process to Cortex Cloud, Capture V2 uses a more advanced algorithm that can model complex analog behavior beyond what is possible with on-device processing. Capture V2 brings major improvements to devices that rely heavily on touch and dynamics. These devices are notoriously difficult to capture accurately, making V2 the most authentic solution on the market for reproducing the dynamic cleanup behavior of a vintage fuzz, the natural bloom of a sagging power amp, and the fast transient response of a studio compressor. V2 Capture creation is currently available only on Quad Cortex. NanOS 2.2.0 introduces the Capture 2 Player, which lets Nano Cortex load and play V2 Captures created on Quad Cortex. Support for creating V2 Captures directly on Nano Cortex is under development. CorOS 3.3.0 🔥 Neural Capture Version 2 🔥 669 V2 Captures across 41 devices 🔥 29 new virtual devices: ⚙️⚙️ Dumbbell ODS (Dumble® Overdrive Special®) ⚙️⚙️ 17 Cabs ⚙️⚙️ Mono Synth ⚙️⚙️ Micro Processor (ST) (Eventide® Micropitch Delay®) ⚙️⚙️ Pattern Tremolo ⚙️⚙️ Bit-Crusher Engine (M) ⚙️⚙️ Bit-Crusher (ST) ⚙️⚙️ Phase-Locked Loop (EarthQuaker Devices® Data Corrupter®) ⚙️⚙️ 81 Creations Drive (1981 Inventions® DRV®) ⚙️⚙️ Aggi Sub Octaver (Aguilar® Octamizer®) ⚙️⚙️ Spring Reverb Engine (M) ⚙️⚙️ Spring Reverb Engine (ST) ⚙️⚙️ Auto Wah 🔥 Several quality of life improvements Cortex Control 1.4.0 Cortex Control has been updated to support CorOS 3.3.0. To create a Neural Capture V2, you need the latest versions of CorOS and Cortex Control. NanOS 2.2.0 🔥 Neural Capture Version 2 🔥 669 V2 Captures across 41 devices (downloadable from the official Neural DSP Cortex Cloud profile) 🔥 Cortex Cloud offline mode 🔥 Automatic Sum to Mono 🔥 Tremolo 🔥 Capture auditioning 🔥 Cloud backups Read everything about this huge update here: 🗞️

Neural DSP

36,094 views • 8 months ago

Announcing How Transformer LLMs Work, created with Jay Alammar and Maarten Grootendorst, co-authors of the beautifully illustrated book, “Hands-On Large Language Models.” This course offers a deep dive into the inner workings of the transformer architecture that powers large language models (LLMs). The transformer architecture revolutionized generative AI; in fact, the "GPT" in ChatGPT stands for "Generative Pre-Trained Transformer." Originally introduced in the Google Brain team's groundbreaking 2017 paper "Attention Is All You Need," by Vaswani and others, transformers were a highly scalable model for machine translation tasks. Variants of this architecture now power today’s LLMs such as those from OpenAI, Google, Meta, Cohere, Anthropic and DeepSeek. In this course, you’ll learn in detail how LLMs process text. You'll also work through code examples that illustrate that transformer's individual components. In details, you’ll learn: - How the representation of language has evolved, from Bag-of-Words to Word2Vec embeddings to the transformer architecture that captures a word's meanings taking into account the context of other words in the input. - How inputs are broken down into tokens before they are sent to the language model. - The details of a transformer's main stages: Tokenization and embedding, the stack of transformer blocks, and the language model head. - The inner workings of the transformer block, including attention, which calculates relevance scores, and the feedforward layer, which incorporates stored information learned in training. - How cached calculations make transformers faster. - Some of the most recent ideas in the latest models such as Mixture-of-Experts (MoE) which uses multiple sub-models and a router on each layer to improve the quality of LLMs. By the end of this course, you’ll have a deep understanding of how LLMs actually process text and be able to read through papers describing the latest models and understand the details. Gaining this intuition will improve your approach to building LLM applications. Please sign up here:

Andrew Ng

259,920 views • 1 year ago

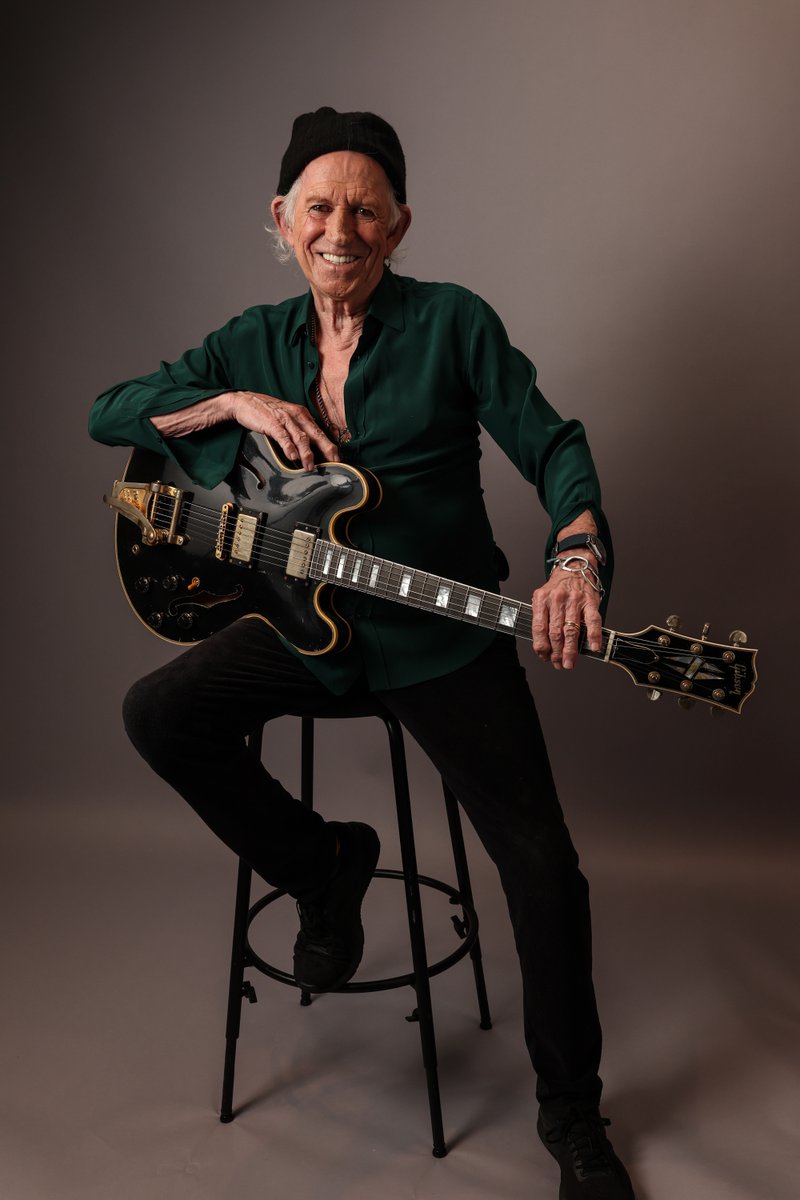
A love letter to one of the coolest guitars of all time. Is there a more iconic guitar player on Earth than Keith Richards? For more than six decades, the “Human Riff” has been the heartbeat of The Rolling Stones, inspiring millions of fans and musicians the world over to get out of their seats and rock ’n’ roll. It’s difficult to imagine the popular music landscape without the monolithic presence of Keith Richards looming over it with impossible cool, godlike nonchalance, and, of course, impeccable taste in guitars. Ask any guitarist which instrument of Keith’s they desire the most, and we’re willing to bet his black 1960 Gibson ES-355 is top of the list. Keith first used an ES-355 back in 1969, taking it out on the road and into the studio during the legendary recording sessions for Sticky Fingers and Exile on Main St. His black 1960 model has also been a staple of each and every planet-straddling Rolling Stones tour since 1997. Now, we are proud to present the Keith Richards 1960 ES-355 Collector’s Edition guitar, an exacting replica of the Gibson ES-355 he made famous. Handcrafted in the Gibson Custom Shop in Nashville, Tennessee, it’s not just a tribute to Keith’s original guitar; it’s effectively a clone, employing new 3D scanning technology, identical materials and construction methods, and meticulous Murphy Lab aging. The devil is in the details, and this guitar captures every nuance of the original, right down to the sonics. Limited to only 150 guitars worldwide;. 100 hand-signed by Keith Richards on the F-hole label, and 50 hand-signed on both the F-hole label and the back of the headstock. Read more about our partnership here: #Gibson #GibsonCustom #KeithRichards #ES355

Gibson

107,881 views • 6 months ago

HERMES AGENT BECOMES 10X MORE USEFUL WHEN YOU CONFIGURE THESE 5 THINGS. EACH ONE TAKES 5 MINUTES. MOST USERS NEVER TOUCH THEM. 1. THE RIGHT MODELS one model for everything = wrong model for most things. GPT-5.6 Sol: strongest reasoning. daily driver. access through your ChatGPT subscription (Plus or higher). Max plan unlocks higher reasoning effort. Grok 4.5: live X search. fastest responses. access through your X Premium+ subscription. "find me 3 high-engagement Hermes posts from the last 5 days." Grok pulls directly from X. no scraping. real-time. Kimi K3: design powerhouse. comparable quality to Claude Fable 5 at roughly 30% of the price. takes longer to generate. the quality justifies the wait. connect via Desktop app / Dashboard: Models → add provider. GPT-5.6: ChatGPT subscription → OAuth. Grok 4.5: X subscription → OAuth. Kimi K3: OpenRouter or Nous Portal. switch between them mid-session: /model [name] 2. PARALLEL TOOL CALLS Hermes used to call tools one at a time. Gmail, then calendar, then web search. sequential. now: multiple tool calls run simultaneously. "check my emails, check my calendar, tell me the weather in Dubai, and find the latest Hermes updates." four tools at once. results merge when all finish. what used to take 3 minutes takes 30 seconds. automatic after update. no config needed. hermes update 3. FASTER AND CHEAPER WEB SEARCH two improvements. one automatic, one you configure. AUTOMATIC (update only): v0.19.0 processes web pages differently. clean content straight to the agent without redundant processing steps. 60x faster. 49x cheaper. no config needed. CONFIGURE (Firecrawl): Firecrawl is the default scraping backend. strips HTML, ads, navigation, scripts. returns only the text your agent needs. 500 free credits per month on free tier. get your key from firecrawl .dev. add to .env: FIRECRAWL_API_KEY=your_key Nous Portal subscribers: Firecrawl is included through Tool Gateway. no separate key needed. SAVE MORE (auxiliary model): web summarization defaults to your main model. route it to a cheap model: auxiliary: web_extract: model: google/gemini-3-flash-preview cheap model reads the page. premium model reasons about the content. 4. MORNING BRIEF WITH EMAIL + CALENDAR connect Gmail and Google Calendar via MCP: 1. go to mcp .zapier.com 2. add Gmail: enable read and draft only. never enable send. one automated email from the wrong context can cost a relationship. 3. add Google Calendar: read access. 4. click connect → sign in → regenerate token 5. paste the token into Hermes chat tell your agent: "create a

YanXbt

29,620 views • 10 days ago

Meet My AI Ears. A lot of folks ask me how I capture ASMR video and audio for training of AI? I always use Binaural 3D audio and have for decades in different forms. But how? A Brief History of Binaural Recording Binaural recording, the foundation of 3D audio, dates back to 1881 when French inventor Clément Ader created the first system using multiple telephone transmitters at the Paris Opera to transmit stereo sound to listeners, simulating spatial presence. By the 1920s, patents like W. Bartlett Jones’ 1927 filing advanced devices for capturing and reproducing “binaural” signals. The 1930s saw Alan Blumlein’s work on stereophonic sound, which he termed “binaural,” laying groundwork for modern stereo. Commercial milestones hit in the 1950s with binaural records from labels like Cook Laboratories and the first binaural reel-to-reel tapes. A resurgence came in the 1970s with Neumann’s KU-80 dummy head, the first commercial binaural system. Today, it’s integral to VR, ASMR, and immersive media. The Technology of Binaural 3D Audio At its core, binaural recording mimics human hearing by using two microphones placed in ear-shaped molds or a dummy head, separated like human ears (typically 14-18 cm apart). This captures spatial cues: interaural time differences (ITD) for sound arrival timing, interaural level differences (ILD) for volume variations, and head-related transfer functions (HRTF) that account for how the head, torso, and pinnae filter sounds. The result? A 3D soundscape that tricks the brain into perceiving direction, distance, and elevation when played back via headphones—no speakers needed for immersion. Advanced setups use omnidirectional capsules (e.g., DPA 4060) for high-fidelity capture, often in silicone ears to replicate natural diffraction. I use the 3DIO Microphones today but I would cover a dummy head in texture material and place two stereo (4 channels) microphones in each ear. I would then mix down the resulting signals into stereo. The 3DIO series features dual omnidirectional capsules in realistic silicone ear molds, spaced 14 cm apart for compact, accurate 3D capture based on over 13 years of research into human hearing. Models like the Free Space Pro II use premium DPA 4060 CORE capsules for ultra-low noise and high sensitivity, delivering stereo output ideal for immersive applications like game audio. Today just about any ASMR producer uses these. But I use them to capture, curate and archive sound and video we will lose or just about lost for AI training in a way no model or AI company is doing today. I am duplicating the human 3D binaural audio experience and memory. Below is a crude demonstration. If you can listen in headphones. Or turn your phone sideways to feel the audio space. I’ll have a far more professional demo soon to show the real power of 3D audio. (Oh that music is a MIDI player that uses disks to play).

Brian Roemmele

30,800 views • 7 months ago

Biggest announcement in company history. Here it goes: Platter+ is now live on the Shopify App Store and free to start. Platter+ lets you optimize your checkout and post-purchase without needing a designer or developer. It takes minutes to set up and start driving additional revenue: → Download the app directly to your Shopify admin → Select and configure pre-built checkout and post-purchase extensions → Turn them on and see the conversion rate and AOV increase The checkout and post-purchase experiences are often overlooked, but they’re the simplest and quickest way to drive more dollars from existing shoppers. We’ve worked with hundreds of brands to address high checkout abandonment rates, struggling conversion rates, and low AOV. All of that has been built directly into this product. You spoke, and we listened. Brands are tired of usage-based pricing. It’s unpredictable and feels like a tax on success. That’s why we chose a flat fee pricing model. It’s simple: you pay the same amount, whether you generate $1,000, $100,000, or $1,000,000. Over 150 of our customers have been using the app for months to drive incremental sales. Most merchants see a sales lift minutes after going live. If you’ve read this far, we want to make it easier for you. We built the most extensive playbook on checkout optimization, period. 100+ pages, 15 partners, Shopify-endorsed. We’ll give it to you for free. Here’s how to get it: → You MUST connect with me on LinkedIn (I can’t send it otherwise) → Like this same post on LinkedIn and comment “Checkout” I’ll DM it to you. To sweeten the deal, our team will build you an optimized checkout experience in a 15-minute meeting. If you’re interested, message me, and I’ll ensure you get taken care of.

Ben Sharf

18,074 views • 1 year ago

#3 The prevalence of vegetable oils in processed foods is staggering due to their cost-effectiveness. But how often do you take a moment to read the small print on the back of a product? Here's a simple rule: whenever you spot "vegetable oil" in the ingredients, RUN FOR YOUR LIFE. 💡 Now, let's delve into the history of why vegetable oils became so prevalent a century ago. Back in 1900, an entirely different story was unfolding across the ocean. The German army was actively seeking a synthetic lubricant for diesel engines used in submarines. In 1902, the German chemist Wilhelm Normann achieved a groundbreaking milestone by successfully solidifying vegetable oils. At the same time, the United States was grappling with a surplus of cotton production, leading to a dilemma on how to utilize the waste streams, especially the seeds. Instead of discarding them, someone had the idea to extract oil from these seeds. However, there was a significant hurdle to overcome – the presence of a toxin called gossypol within the cotton seeds. 🔥 To rid the oil of toxins like gossypol found in cotton seeds, a similar refining process was employed, involving high heat, chemicals, and immense pressure. Yet, this process had its own set of problems. Exposure to high heat during refining made the oil prone to oxidation, leading to the accumulation of free radicals, which harm cells and contribute to illness and aging, as explained in a previous post. 🕰️ Around 1920, this product was transformed into something you might recognize today as 'Crisco,' an abbreviation for Crystalized Cottonseed Oil. But eventually, soybean oil emerged as a cheaper alternative. Remember, in the world of business, profits often take precedence over people's health. Watch the whole video about ‘The $100 Billion Dollar Ingredient making your Food Toxic’ here:

Dr. Simon

164,838 views • 2 years ago

🌆 Digital Evidence, Real Estate, and the Next Wave of Real-World Adoption Dave Berg, CPO at Constellation, breaks down how they are building real onchain infrastructure that solves real problems. Not hypothetical use cases. Not hype cycles. Actual products people can use right now. 1. Digital Evidence. Authenticity for the internet. Constellation is anchoring digital fingerprints of files, images, documents, and data streams directly onto the network. Why does this matter? Because in a world filled with AI content, fake screenshots, edited PDFs, and manipulated media, proving the origin of information is becoming one of the most valuable capabilities we have. Developers and non developers can use simple APIs, or even vibe code with AI tools like Claude, to anchor and verify data instantly. Everyday users can anchor real-world data right now onto Constellation network with zero blockchain knowledge, using devices they already use every single day. 2. Proof of Management for real assets. This leads into what might be one of the most practical DLT products released in years. Real Estate Ledger. A digital guidebook for any property: • Permits • Warranties • Proof of maintenance • Vendor history • Manuals • Insurance • Improvements • Receipts • Photos Everything tied to the property, all cryptographically timestamped. If you have ever tried to sell a house, maintain one, or prove something to an insurer, you instantly understand how useful this is. Imagine handing a buyer a clean, verified report of every repair, every vendor, every upgrade, and every warranty. Imagine builders uploading materials and documentation during construction so the next owner knows exactly what is behind the walls. Imagine insurance claims based on truth instead of paperwork chaos. This is not a pitch deck about tokenizing real estate one day. This is infrastructure that exists right now. 3. Constellation is solving real adoption problems for Web3. No need to rebuild your business to onboard. No need to run your own nodes unless you want to. No need to become a blockchain expert. Just clean APIs, onchain trust, and applications anyone can understand. Authenticity and truth are scarce assets, Constellation (DAG) is building rails that protect them. Podcast powered by Constellation²

Generation Infinity

170,375 views • 8 months ago

100 years. 10 iconic looks. One seamless journey through the evolution of men's fashion. Which decade would you wear? 👔✨ Created with GPT image 2.0 and Seedance 2.0 on Thank You AI PROMPT: Style: Ultra-realistic cinematic fashion reel, luxury editorial, premium Instagram creator aesthetic, smooth camera movement, natural lighting, 4K, highly detailed fabrics, realistic clothing physics. Scene Overview A stylish male model showcases five iconic fashion eras from the 1920s to the 1960s. The video takes place in the same modern studio with soft daylight and a clean architectural background. The same model appears throughout the video while only the clothing changes between decades. Every outfit change happens naturally during camera movement, creating a smooth and satisfying visual flow. The only on-screen text is the decade name. Music is a modern electronic fashion track that builds continuously without vocals. Character Use the reference image as the model. Young adult male. Confident but relaxed. Friendly expression. Natural walking pace. The same model appears in every scene. Environment Minimalist fashion studio. Large windows. Warm daylight. Neutral beige walls. Polished concrete floor. Luxury editorial atmosphere. Keep the background consistent throughout the video. 0:00–0:03 — 1920s The video opens with the model standing confidently in the center of the studio. The camera slowly moves closer. He adjusts his cufflinks before looking toward the camera. Outfit Charcoal pinstripe three-piece suit White dress shirt Dark tie Waistcoat Pocket watch chain Oxford shoes Grey newsboy cap On-screen text: 1920s As the camera quickly pans to the right, the clothing smoothly changes into the next decade. 0:03–0:06 — 1930s The camera finishes the movement. The model now wears a cream double-breasted suit with wide lapels, pleated trousers, spectator shoes, and a fedora. He places one hand in his pocket and takes a confident step forward. On-screen text: 1930s The camera gently circles around him, and during the movement the outfit changes into the next style. 0:06–0:09 — 1940s The camera completes the circle. The model now wears an olive green utility jacket with tailored trousers, brown leather boots, and a classic wristwatch. He buttons the jacket while walking slowly toward the camera. On-screen text: 1940s A warm light sweep crosses the frame, leading naturally into the next outfit. 0:09–0:12 — 1950s The model now wears a fitted white T-shirt, dark blue cuffed jeans, a brown leather belt, leather boots, and classic sunglasses. He casually adjusts the sunglasses before taking two relaxed steps forward. On-screen text: 1950s The camera briefly moves closer, then pulls back, allowing the clothing to change smoothly. 0:12–0:15 — 1960s The model now wears a black turtleneck, camel overcoat, slim trousers, Chelsea boots, and a simple wristwatch. He walks confidently toward the camera with both hands in his coat pockets. On-screen text: 1960s During the final second, the camera begins a slow clockwise circle around him. His coat moves naturally as he lightly adjusts the collar. The music continues to build instead of ending. 0:15–0:18 — 1970s The video begins exactly where Part 1 ended. The camera continues its slow clockwise movement around the model before settling into a smooth front-facing angle. The music hits the next beat naturally. Outfit Brown suede jacket Patterned open-collar shirt Flared trousers Brown leather belt Platform shoes Gold wristwatch Aviator sunglasses The model adjusts his sunglasses before removing them with a confident smile. On-screen text: 1970s As the camera moves slightly closer, the outfit changes naturally into the next decade. 0:18–0:21 — 1980s The camera continues tracking forward. The model now wears a charcoal oversized business suit with a patterned tie, pleated trousers, polished loafers, and a classic dress watch. He straightens his tie while walking confidently toward the camera. On-screen text: 1980s The camera briefly passes beside him, creating a smooth transition into the next outfit. 0:21–0:24 — 1990s The camera emerges on the opposite side. The model now wears an oversized light-wash denim jacket over a graphic T-shirt, relaxed jeans, chunky white sneakers, and a simple silver chain. He smiles naturally while walking across the frame with both hands in his jacket pockets. On-screen text: 1990s The camera follows his movement before quickly swinging to reveal the next decade. 0:24–0:27 — 2000s The camera settles into a smooth tracking shot. The model now wears a black leather jacket over a fitted white T-shirt, slim dark jeans, white high-top sneakers, and aviator sunglasses. He casually removes the jacket from one shoulder while continuing to walk. The movement of the jacket naturally fills part of the frame as the clothing changes into the final look. On-screen text: 2000s 0:27–0:30 — 2020s The jacket clears the frame. The camera slowly pushes toward the model. He now wears a modern quiet luxury outfit. Outfit Beige overshirt Premium white T-shirt Relaxed tailored trousers White minimalist sneakers Luxury stainless steel watch Simple silver ring The model walks toward the camera before stopping naturally. He smiles confidently while looking directly into the lens. On-screen text: 2020s The decade text gently fades into: 100 YEARS OF MEN'S FASHION Then below it: 1920 → 2020 The music reaches its final peak before fading smoothly. The camera holds on the model for a brief moment before fading to black. Camera Style Smooth cinematic movement Gentle dolly shots Slow orbit around the model Occasional push-in Natural handheld feel Soft depth of field Luxury fashion commercial look Visual Style Premium editorial photography Warm natural colors Soft contrast Highly detailed fabrics Clean tailoring Realistic lighting Crisp facial details Natural movement Elegant pacing

Caden Flux

30,445 views • 7 days ago

I've been with Firstock since day one, and we’ve worked closely with Vikram, the founder. In 2023, Firstock set out to build the fastest, most user-friendly trading app completely in-house. After countless meetings, iterations, and late nights, I’m proud to present the latest version of the Firstock web and mobile app—designed to transform your trading experience. 🚀 You can open your account here: (Open your account today for exciting offers) Experience Demo Account: Zero Hassle. Zero Charges. Maximum Power. With Firstock, you get: * ₹0 Delivery Charges * ₹0 API Fees * ₹0 Account Opening Charges * ₹0 Pledge Charges * ₹0 AMC * ₹0 Pay-in Charges * Just ₹20/order for F&O trades What do we have? For Investors: Let’s begin with what Firstock offers to investors: 1. Fundamentals at Your Fingertips Access detailed stock charts and fundamental data directly within the app—no need to go elsewhere. 2. Holding Performance Overview Track your portfolio's performance with full visibility into all corporate actions affecting your holdings. 3. Complete Holding Analysis Gain a holistic view of your portfolio through our intuitive holdings dashboard. 4. Instant Pledge for Instant Margin Need margin quickly? Instantly pledge your stocks and start trading within minutes—no delays. Confused about what to invest in? 5. Curated Investment Ideas Explore top-performing market movers, sectoral trends, and international ETFs to make informed investment choices. 6. Custom Screeners Build your own stock screeners to filter out investments that match your strategy and risk appetite. --- For Traders: Built by traders, for traders—our platform is designed to meet your high-speed, high-efficiency needs. 1. Sticky Orders & Bulk Slicing*l Place large orders with ease. Our bulk slicing and sticky order window make placing, modifying, and exiting large quantities seamless. 2. Options Strategy Builder Design strategies directly from the option chain, view the payoff graph, and execute instantly. 3. Live Position Analysis Analyze and tweak your open positions directly from the position book—no switching screens. 4. Custom Strategy Execution Save your favorite strategies and execute them when the timing is right. 5. Advanced Option Analytics View real-time data like OI, Max Pain, and synthetic futures to make quicker, smarter trading decisions. 6. Pre-Built Straddle and Strangle Tools Trade straddles or strangles effortlessly using our dedicated strategy screens. --- Now on Mobile: Enjoy the same powerful features on our brand-new mobile app—designed for ease, speed, and convenience. --- Try it Today: Experience the platform with our demo—explore all features before you commit. Explore Demo Account: You can open your account here: --- This is just the beginning. We’re continuously building features that will redefine the way you trade. Have suggestions or feedback? I’d love to hear from you personally. Let’s grow together.

Saketh R

15,618 views • 1 year ago

GeoLibre v2.3.0 is here! GeoLibre is a free and open-source, lightweight, cloud-native GIS platform for visualizing, exploring, and analyzing geospatial data. It runs everywhere you do, in the web browser, on the desktop, on mobile, and inside Jupyter notebooks, all while keeping your data local and private. This release brings a legend that writes itself from your symbology, a new GeoLens catalog browser, and 200+ GeoLibre Rust geoprocessing tools running entirely in the browser. What's new in v2.3.0 - Automatic on-map Legend: the legend builds itself from your visible layers, with class rows for graduated, categorized, rule-based, and expression styling, gradient bars for heatmaps and raster colormaps, and land-cover labels from a Raster Attribute Table. Rename, hide, reorder, or add your own entries, and it saves with the project. - Symbology swatches in the Layers panel: every row shows a dot, line, square, or image glyph in the layer's own color, so a tall layer stack reads at a glance. - GeoLens catalog browser: connect to a self-hosted GeoLens server, search its catalog, and add datasets as vector tiles, GeoJSON, or rendered raster tiles. - Emerging Hot Spot Analysis: build a space-time cube from timestamped points and classify every cell as a new, intensifying, persistent, diminishing, sporadic, oscillating, or historical hot or cold spot, all client side. - Mosaic time series: the Time Slider now steps through MosaicJSON and STAC collections of many COGs per date, on either a GPU or a WASM rendering engine. - Copy and paste layer styles: give a whole set of layers one consistent look without restyling each in turn. - Shareable tool links: deep-link any Whitebox tool with a ?tool= URL that opens the dialog preselected and pre-fills the form, with a Copy link button to build it for you. - Smarter data loading: pick which layers to load from a multi-layer GeoPackage, import CSVs whose coordinates are in any projected CRS, and read a raster's real CRS, pixel size, and extent from the metadata dialog. - Multiple AI profiles: define several provider, model, and credential setups, pick a default, and switch between them from the assistant panel. Try it out - Launch GeoLibre Web: - GitHub: - Documentation: - Release notes: #GIS #Geospatial #OpenSource #RemoteSensing #MapLibre #GeoLibre

Qiusheng Wu

287,601 views • 7 days ago