
Rassoul Edji
@RassoulEdji • 9,663 subscribers
Filmmaker, Founder & CEO of @Luminairii. Former Lead VFX artist in the film industry 🎬
Shorts


Videos

For the first time in any Transformers film, the human lead gets his own suit which he can use to fight the Terrorcons in Transformers Rise of the Beasts. This is of course Noah's Exo-suit. This suit was a lot of fun to work out and design. We tried to maintain a lot of similarities between it and Mirage since that was where the suit was coming from, but of course the pieces couldn't be 1:1 from Mirage. We ended up designing a lot of the pieces from scratch and the pieces that we could take from Mirage were massively modified to work well for the far smaller scale and tighter proportions of Noah. Because I had developed a procedural setup for all of our hero characters texturing and look development, the textures and look development of the suit were directly taken from Mirage and updated by our artists to work well for the suit through manual painting and tweaks. It was crucial that the suit still read as Mirage's body parts and not entirely new random metal parts. We handed the asset to WetaFX for the last sequence and they did an excellent job of integrating it beautifully into the live action footage and bringing the suit to life on Noah.
Rassoul Edji1,954,788 views • 7 months ago

The Driller Bot from #Transformers Dark of the Moon was the most complex asset ILM had done for Transformers by that point. It had 70,000 individual parts, over 7x more than Optimus Prime. This sequence where it is crushing the skyscraper took 288 hours per frame to render with all of the reflections and simulations. During the last weekend, ILM used their entire render farm, amounting to 200,000 rendering hours per day which is 22.8 years of rendering time in 24 hours.
Rassoul Edji5,684,653 views • 1 year ago


Devastator from #Transformers Revenge of the Fallen was the biggest creature ILM had ever done up to that point. It was so complex and so heavy that it melted a couple computers of the artists at ILM. The first time they showed Devastator to Michael Bay he said that it needed to be bigger and more detailed, so ILM went back and almost doubled him in size and complexity. ILM artists decided that the Devastator asset should be comprised of multiple different rigs, the two arms, the two legs, the torso, and the head. Exactly like it is in the final movie. Fun facts: • He was over 100 feet tall • He was made up of 52,632 individual parts • If laid out, all of his parts would add up to 14 miles long • Devastators hand travels at 390 miles per hour when he punches the pyramid • The pyramid destruction simulation was 8 times bigger than ILMs previous largest rigid body simulation Devastator was the second most complex asset ever in the Transformers franchise, second only to the Driller Bot from Dark of the Moon. A lot of the projects I work on today are very large scale and complex and I still run into computation and data management challenges in 2024. This gives me a massive amount of respect for the work done by ILM all the way back in 2008-2009 for this film. Truly mind blowing technical and creative artistry! CREDITS Video by Paramount VFX by Industrial Light & Magic (ILM)
Rassoul Edji1,107,990 views • 1 year ago

It's no secret that Michael Bay likes to shoot his films with as much practical effects as possible. In #Transformers (2007) there is a shot where Optimus Prime and Megatron crash through a building, this shot was done practically using a miniature at 1/4 scale by ILM. Doing this shot practically allowed them to get the randomness of the destruction without having to do expensive simulations. The CG robots were then added into the shot to merge the photographic plate with the CG elements. When doing live-action films, it is always a good idea to shoot physically as much as possible. This provides the VFX artists with real world reference to ground their work in and allows them to compliment the shot with CG elements. One of the reasons the original Transformers trilogy looks so good is because of the incredible blend of practical and digital effects. It is difficult to watch the film and spot what is real and what is CG. ILM VFX Supervisor Scott Farrar talks through how this scene was pulled off:
Rassoul Edji512,825 views • 1 year ago

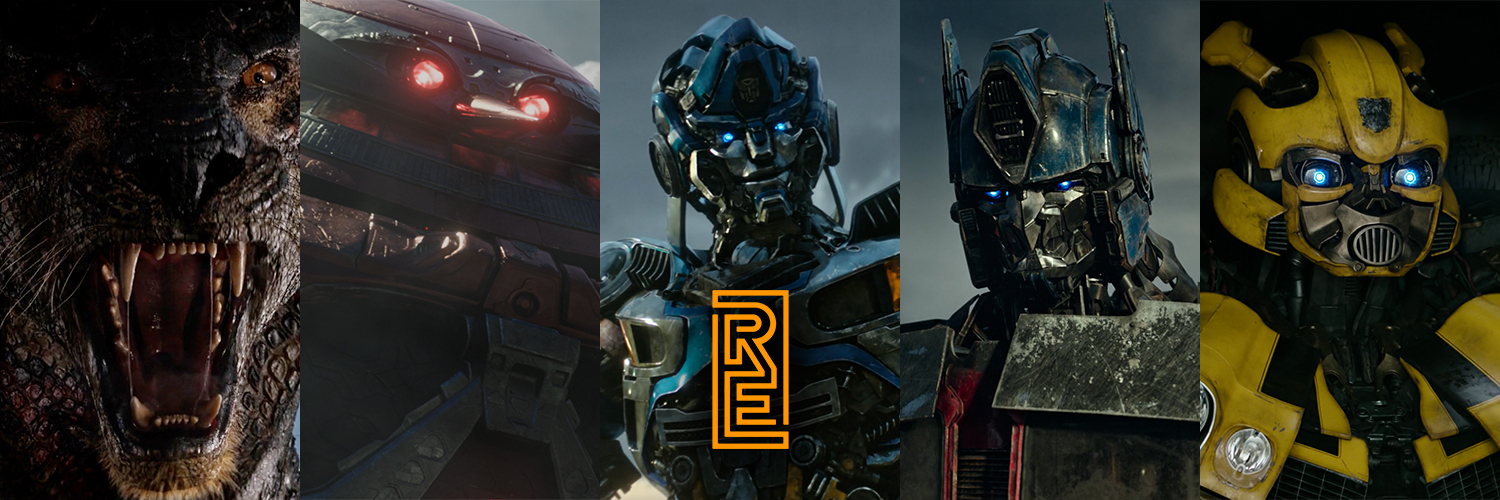
I modelled the head, face, and battle mask for Optimus Prime for #Transformers ROTB. I also designed his new "centurion" open battle mask look along with it's animation. The director wanted the face to resemble the face from the 2007 Transformers film as ROTB was a soft-prequel to it but also wanted it to be tweaked to fit the new design and for us to give it some new unique features. This is where we came up with the new mask design which doesn't get entirely hidden when open. Instead, it gets stored on the side of his cheeks, like a Roman centurions helmet. The head design is derived from his model from the 2018 Bumblebee film to keep some consistency with that film too as ROTB was also a soft-sequel to Bumblebee. There are new pieces, adjusted proportions, and reworks to detailing in ROTBs version. The face proportions are modified from the 2007 face to be a lot wider and beefier, matching his new head shape and look. I redesigned and built the eyes from scratch using our kitbash pieces like I did for all the Maximals and Mirage. The studio decided against going for the holographic eyes look from the 2018 Bumblebee film but rather wanted a more simple look in between the 2007 and the 2018 eyes. I added a lot of small mechanical details to his battle mask animation which we unfortunately never get to see in the film. For example, I designed a fully functional mechanism which pushes his chin piece back when his mask closes. This was very cool when it was visible, our Animation Director and VFX Supervisors were super excited about it, but unfortunately no shot showed it off in the final film. It was a lot of fun to help model and design Optimus Prime for this film. I'm happy I got to contribute to such an iconic character. CREDITS: Video: Paramount, MPC, WetaFX Ruairidh MacNeill modelled the body for Optimus
Rassoul Edji388,350 views • 1 year ago


By far the biggest and heaviest asset on #Transformers ROTB was Stratosphere. Tens of thousands of objects and over 1400+ UDIMs. It was a massive technical undertaking pushing this character through our pipeline and workflows. I spent a lot of time working with the team to optimize him and our methodologies for creating him. He originally played a bigger part in the films finale, but his role in it was eventually scrapped.
Rassoul Edji478,524 views • 2 years ago

Hyperion was designed to be mechanically plausible, being mainly driven by pistons and other recognisable pieces. I was keen on maintaining a grounded look for Hyperion. I love the small details we were able to add of objects being pushed out of the way by the rigs movement. It adds so much character in shots when everything is animated. #mecha #3d #vfx #cgi #rigging #animation
Rassoul Edji321,721 views • 1 year ago

Stratosphere was our biggest and heaviest character on #Transformers ROTB. He was a real challenge to deal with on the Modeling, Texturing, and Rendering side. He had 1434 UDIMs due to his immense scale and was made up of tens of thousands of objects. His level of detail was truly something else. His vehicle form was also a behemoth. We had also built a mortar for his robot form and a cannon for his vehicle form but neither of these made it into the film as his part in the final battle was cut out. He was originally supposed to help out in the final battle, using both of these weapons against the Sweepers and Predacons. The decision to cut him from the final act came very late as all of his assets were final at that point. We were never told the reason why his role was cut from the film. I had to re-design my texturing system in Mari when working on him to ensure that it could handle such a complex and large character. I had to simplify a lot of the procedural systems and even had to branch off some of them into their own files to ensure that artists could work with somewhat decent performance. We ran into a lot of issues pushing him through our pipeline, both as a model as well as rendering him due to the sheer amount of objects and textures that had to be processed. For shots, it was requested by Lighting that we reduce his memory footprint as Google had complained he was taking up too much memory and their I/O for rendering on the cloud was being affected. The leadership team and I decided that the best way to do this was to half the texel density on the parts that wouldn't be visible in our approved shots and to also half the resolution of the textures in the parts not visible to camera. This allowed us to optimize his memory footprint both in shots as well as storage and I/O. It was massive technical undertaking working on Stratosphere, so much so that we had to delay getting him into shots as we simply couldn't push him through with our normal tooling. I really enjoyed the challenge that he posed for us as a team. CREDITS: Primary Modeling by Oscar Lowe Support Modeling by Arthur Grandjean and his team Final Texturing & Lookdev by Yaz Raji Video credits: Breakdown shot by MPC Film footage by Paramount
Rassoul Edji268,448 views • 1 year ago

For #ToyStory 4, instead of manually creating cobwebs for their Antique Mall environment, Pixar created AI spiders which would weave realistic cobwebs for them like a real spider. You can see the red dots which are the AI spiders as they weave cobwebs in real-time. This allowed the team to quickly and easily add cobwebs to their environments in a realistic manner. Any cobwebs that required interaction with characters were created manually to ensure that they behaved as the animators expected. The AI spiders were created by Hosuk Chang, a Sets Extensions Technical Director at Pixar.
Rassoul Edji246,514 views • 1 year ago


Mirage was the new human-buddy lead in #Transformers ROTB. The studio wanted a character other than Bumblebee to have that role and be in the spotlight with Optimus Prime. He was designed to look "handsome" and to be sporty. He was the only character in the film with more than 1 alternate form. He had a total of 4 that we built in 3D (1 of which was cut from the film) and 1 that was only in live action (the garbage truck). I served as the asset Lead and did the Primary Texturing & Look Development for him. I also modelled and designed his eyes, upgrading them from what we had originally in the concept and ref. We spent a lot of time getting his car paint to look correct in shots, matching closely to on set reference pictures of the Porsche. At the end of the film, Mirage gives up his life and becomes the Exo-suit for Noah. The suit was built separately, using the same tooling and systems as Mirage to ensure visual continuity between them for the transformation from Mirage to Noah Exo-suit. He was voice acted by Pete Davidson, a change which was made later in production. The animators tried to introduce some of Pete's mannerisms into Mirage's animations too. Overall he was a character which was a lot of fun to work on and I'm proud of the work the team did to get him to look the way he does in the final film. CREDITS Primary Modelling by Lilian Robert. Final Texturing & LookDev by Martin Kamminga. Various other artists supported the creation of Mirage and the Exo-suit. The Exo-suit and Mirage were sent to WetaFX for the final sequence. Video by Paramount, MPC, and WetaFX.
Rassoul Edji130,138 views • 1 year ago

As one of the hero assets for our film Outpost Alpha, the AH-64D Apache helicopter was created to a very high degree of detail as it needs to hold up in extreme closeup shots. We designed the rig to reflect how the mechanical parts move in real life, further adding to the realism in our animations. Now it moves on to Texturing and Look Development. Couldn't be happier with the progress we are making on the film at Luminairi.
Rassoul Edji101,483 views • 1 year ago

Water simulation has always been the holy grail of FX, requiring an incredible amount of computation to get right. For Battleship (2012), ILM had to reinvent their water systems to allow them to be able to deliver the show with it's plethora of shots in water. The alien ships are hundreds of feet long and therefore displace massive amounts of water. This, coupled with them making aggressive movements meant that hundreds of millions of droplets of water had to be simulated per shot to get a believable look of water interaction. Before their new water systems, artists were only able to get "1-2 simulations done per day", but with the new system they were able to "do many simulations per day", increasing the iterations and therefore the creative freedom and expression for the artists. ILM has since reworked their water systems multiple times, now being more powerful and accurate than ever, utilizing more powerful hardware and more accurate and efficient simulation algorithms. Today, water simulation is something that can be done a lot easier than before, even being able to do it in real-time with tools such as Unreal Engine and LiquiGen. Houdini is currently the most powerful tool for simulating water or any FX at very high fidelities. Check out some FX flipbooks from ILMs VFX breakdown showing their water work below:
Rassoul Edji86,738 views • 1 year ago

The character we spent by far the longest creating for #Transformers ROTB was Air Razor. We spent over a year working on just her and her variants. The reason she took so long was because there was no unified vision for what she was supposed to look like. We had initial concepts but the leadership team from the studio wasn't happy with how she looked when we matched to them so we had to iterate and develop different styles until they were happy. Our asset supervisor did a mockup redesign of her head to look more like a golden eagle which they liked a lot, this is what the final head shape was decided to be. We opted to match her styling to a peregrine falcon as the animation director really liked the breakup and contrast that provided. She is the only hero character in the film without an alt mode. She only has her bird form. It was decided during the concepting stages of the film that she would not have a robot form. To make her talk, it was decided by the animation director early on that her beak would semi transform to enable some more expressive talking animations as opposed to her just opening and closing her beak. We spent a very long time on her feathers, in modelling, look development, and rigging, ensuring that we matched to the directors vision and that they looked good in shots. She had over 9 variants, each for a different part of the film. She had a battle mode, damage states, and a "virus" infected mode for when she was infected by Scourge. Each of these also had different variants, totalling the final 9 seen in the film. We added a lot of engraving details to her, each being in the official Maximal language, translated from English. For example, the engraving on her chest says "In the absence of light, darkness prevails" Air Razor was a big creative and technical challenge and a massive team effort to get right. We had plenty of sleepless nights while trying to figure her out. CREDITS: Video by Paramount, MPC, and WetaFX I was responsible for her primary texturing and look development and also served as the asset Lead alongside Tom Goodchild. Primary modeling by Simone Porchedda Final texturing & lookdev by Vipin Kabadi Primary rigging by Tom Goodchild Various other artists supported the modeling, texturing, and rigging of Air Razor, I unfortunately do not recall everyone's names - she was a big team effort.
Rassoul Edji83,383 views • 1 year ago


Mechanical feet are always a challenge to design and develop as they need to support near omni-directional movement. For organic creatures this isn't a problem, but for mechanical designs you need to figure out ways the pieces can slide over each other and move in a realistic manner. For Hyperion, I designed the feet with three primary pistons which handle most of the movement, almost like a ball joint. The rest of the mechanisms are hinges and overlapping panels which slide on top of one another when the feet moves. Because of his massive size and weight, I also added a toe spread feature so we could spread his toes when he walks, further selling the weight of the character. Overall I'm very happy with how the feet turned out. The feet are the second most difficult joint to work out mechanically. Second only to the shoulder joints. The hips are a close third place. #mecha #3d #vfx #cgi #rigging #animation #characterdesign #hardsurface
Rassoul Edji61,400 views • 1 year ago