Video wird geladen...

Video konnte nicht geladen werden

Zur Startseite

gpt-image-2.5 promised richer detail than gpt-image-2 – we verified the setup: two character sheets, each rendered once with gpt-image-2 and once with gpt-image-2.5, animated identically by bytedance's seedance 2.5 observations: • Sam Altman's mouth grille goes from five coarse slots to a fine louvre mesh • sam's wrist gets...

10,189 Aufrufe • vor 14 Tagen •via X (Twitter)

6 Kommentare

Profilbild von Alina Fomina
Alina Fominavor 14 Tagen

@sama wow, gpt-image-2.5 delivers more details. wish to see this dance from @sama and @finkd in reality 🫢

Profilbild von thehype.
thehype.vor 14 Tagen

@sama @finkd easy peasy 😉

Profilbild von Vladimir Arustamov
Vladimir Arustamovvor 14 Tagen

@sama hope to see one day an X account where AI leaders dance differently together 😀 I confirm - I've never seen anything more detailed than pictures by image 2.5 model

Profilbild von thehype.
thehype.vor 14 Tagen

@sama a good model indeed

Profilbild von Addy Crezee | thehype. | /function1
Addy Crezee | thehype. | /function1vor 14 Tagen

@sama ahahah what a dance lol. jokes aside — gpt image is best for story boarding and consistency imho

Profilbild von thehype.
thehype.vor 14 Tagen

@sama 100%

Ähnliche Videos

What started as building a personal taste.md skill for myself, turned into building a pipeline to create any taste as a skill. The most important piece is references. This is where you should spend time. If the references suck, so does the skill. I find that references cropped tightly on details in high resolution work the best. Each image gets analyzed by both Opus 4.7 and GPT 5.5. The analysis is based on why the reference is successful as a piece of design - not what it does functionally. Using two models helps rule out biases and gaps from each. The models focus on layout, spacing, typography, rhythm, composition, hierarchy, etc. At the end, each image has: reference-01/ - opus-4-7-analysis.md - gpt-5-5-analysis.md Then we fuse them together using GPT 5.5 - but the md files are anonymized so 5.5 doesn't prefer itself. reference-01/ - fused-analysis.md reference-02/ - fused-analysis.md etc. After fusion, we have one synthesized analysis per reference. Now the goal is to combine all of those into a single rule set. This is where chunking matters. If you ask one model to combine 100 image analyses at once, the result becomes too broad. It summarizes instead of preserving the granular design rules we want. Instead we chunk the fused analyses into smaller groups. Each group gets merged into a chunk-level synthesis, usually from around 6 to 8 image notes at a time. Then one final model pass fuses those chunks into a single md rule set. Finally, using the rule set, we write a skill of concrete instructions. It enforces constraints, uses imperative wording, and avoids vague taste words.

Jaytel

59,853 Aufrufe • vor 4 Monaten

CLIP by hand ✍️ ~ 13 steps walkthrough below CLIP, Contrastive Language-Image Pre-training, is OpenAI's answer to a question that sounds impossible: how do you put a sentence and a picture in the same space? CLIP shipped when OpenAI was still open, and those embeddings were shared far and wide. Almost every multimodal model you use today descends from them. How does it work? Goal: learn one shared embedding space for text and images. = 1. Given = A mini batch of three text-image pairs. OpenAI trained the original on 400 million. = 2. Text to vectors = Let us look up each word with word2vec. = 3. Image to vectors = We cut each image into two patches and flatten them. Now text and pixels are both just numbers. = 4. The other pairs = Repeat steps 2 and 3 for the rest of the batch. = 5. Encode = Let us push both sides through their encoders, a linear layer and a ReLU. In practice these are transformers, but the shape of the operation is the same. = 6. Mean pooling = We average across the columns, so each image and each sentence collapses to a single vector. = 7. Projection = The text vectors are 3D and the image vectors are 4D, so they cannot be compared at all. A linear layer projects both to 2D. That 2D space is the shared embedding space, and getting here is the whole point of the model. = 8. Prepare for matmul = Let us copy the text vectors down and the transposed image vectors across. = 9. MatMul = We multiply, which takes the dot product of every text vector with every image vector. Each cell is one estimate of how well a sentence matches a picture. = 10. Softmax, e to the power = Raise e to each cell. To keep it hand sized we approximate e with 3. = 11. Softmax, sum = Sum each row for image to text, each column for text to image. = 12. Softmax, normalize = Divide, and out come two similarity matrices, one per direction. = 13. Loss gradients = The targets are identity matrices: a pair that belongs together should score 1, every other cell 0. Subtract the target from the similarity and you have the gradients, in both directions. The takeaway: pairing a picture with a sentence comes down to a single dot product. Everything before step 9 is the work of getting them into one shared space, so that the dot product finally means something. 💾 Save this post!

Tom Yeh

20,750 Aufrufe • vor 1 Monat

[CLIP] by Hand ✍️ The CLIP (Contrastive Language–Image Pre-training) model, a groundbreaking work by OpenAI, redefines the intersection of computer vision and natural language processing. It is the basis of all the multi-modal foundation models we see today. How does CLIP work? Goal: 🟨 Learn a shared embedding space for text and image [1] Given ↳ A mini batch of 3 text-image pairs ↳ OpenAI used 400 million text-image pairs to train its original CLIP model. Process 1st pair: "big table" [2] 🟪 Text → 2 Vectors (3D) ↳ Look up word embedding vectors using word2vec. [3] 🟩 Image → 2 Vectors (4D) ↳ Divide the image into two patches. ↳ Flatten each patch [4] Process other pairs ↳ Repeat [2]-[3] [5] 🟪 Text Encoder & 🟩 Image Encoder ↳ Encode input vectors into feature vectors ↳ Here, both encoders are simple one layer perceptron (linear + ReLU) ↳ In practice, the encoders are usually transformer models. [6] 🟪 🟩 Mean Pooling: 2 → 1 vector ↳ Average 2 feature vectors into a single vector by averaging across the columns ↳ The goal is to have one vector to represent each image or text [7] 🟪 🟩 -> 🟨 Projection ↳ Note that the text and image feature vectors from the encoders have different dimensions (3D vs. 4D). ↳ Use a linear layer to project image and text vectors to a 2D shared embedding space. 🏋️ Contrastive Pre-training 🏋️ [8] Prepare for MatMul ↳ Copy text vectors (T1,T2,T3) ↳ Copy the transpose of image vectors (I1,I2,I3) ↳ They are all in the 2D shared embedding space. [9] 🟦 MatMul ↳ Multiply T and I matrices. ↳ This is equivalent to taking dot product between every pair of image and text vectors. ↳ The purpose is to use dot product to estimate the similarity between a pair of image-text. [10] 🟦 Softmax: e^x ↳ Raise e to the power of the number in each cell ↳ To simplify hand calculation, we approximate e^□ with 3^□. [11] 🟦 Softmax: ∑ ↳ Sum each row for 🟩 image→🟪 text ↳ Sum each column for 🟪 text→ 🟩 image [12] 🟦 Softmax: 1 / sum ↳ Divide each element by the column sum to obtain a similarity matrix for 🟪 text→🟩 image ↳ Divide each element by the row sum to obtain a similarity matrix for 🟩 image→🟪 text [13] 🟥 Loss Gradients ↳ The "Targets" for the similarity matrices are Identity Matrices. ↳ Why? If I and T come from the same pair (i=j), we want the highest value, which is 1, and 0 otherwise. ↳ Apply the simple equation of [Similarity - Target] to compute gradients of for both directions. ↳ Why so simple? Because when Softmax and Cross-Entropy Loss are used together, the math magically works out that way. ↳ These gradients kick off the backpropagation process to update weights and biases of the encoders and projection layers (red borders).

Tom Yeh

67,896 Aufrufe • vor 2 Jahren

i built a way to generate realistic AI influencer vlogs without ever touching a camera. this was supposed to stay internal but f*ck it, i'm leaking the entire production system. pick any topic. or paste in a script. a few minutes later you've got a finished influencer-style vlog with: > a consistent AI character > cinematic shots > natural dialogue > realistic iPhone footage > b-roll here's how it works: the workflow first breaks your script into a complete scene-by-scene storyboard with timestamps, camera directions, dialogue, environments, pacing, and shot planning so every clip has a purpose instead of feeling randomly generated. each scene gets its own reference image prompt for Higgsfield that locks the character's identity, clothing, camera angle, lighting, and environment to keep the person looking the same across the entire vlog. those reference images are then animated in Seedance 2.5 using scene-specific prompts that control movement, lip sync, ambient audio, dialogue, camera motion, and timing so every clip feels like it was filmed on an iPhone instead of generated by AI. finally everything gets assembled in CapCut with b-roll, subtitles, transitions, music, pacing, and final polish into a complete vlog that's ready to upload. you're not filming,hiring actors or recording voiceovers. the whole thing goes from idea → finished AI influencer vlog. the document i'm sharing includes: > the complete scene breakdown framework > every Higgsfield image prompt > every Seedance 2.5 animation prompt > dialogue for every scene > b-roll prompts > editing workflow inside capcut > structural notes that make the vlog feel real instead of AI RT + reply "AI VLOG", i'll DM you the entire production blueprint.(must be following so i can DM.)

Sulfur

73,150 Aufrufe • vor 1 Monat

Fable 5 and GPT-5.6 built the same scroll-animated website from 1 skill in 32 minutes and only 1 of them made it feel like a film. Same prompt: boutique Japan travel brand, origami style. A subway pulls in, a paper house unfolds into a hotel, a bird takes flight as you scroll. Doing this by hand is brutal multiple videos, matched starting frames, frames ripped out 1 by 1 and synced to scroll position. The skill does all of it: Generate 1 anchor image and approve it every scene inherits the style Turn it into video through the Higgs Field MCP (Seedance), straight from the terminal FFmpeg pulls every frame Each frame maps to scroll position, so your scrollbar becomes the playhead Setup is just connecting the MCP and loading the skill works in Claude Code and Codex. It interviews you first about scenes, budget and mobile, then shows the anchor image before burning a single credit on video. Budget reality: 6 scenes runs ~800 credits and is overkill, 4 scenes is the sweet spot, crop-safe mobile is the cheap path. The verdict came down to transitions. GPT-5.6 Soul built strong scenes with incredible detail inside each one then hard cuts between scene 1 and 2, and again between 2 and 3. Fable 5 stitched them together: wires push out of the top of frame while the next scene blurs in behind, gains depth and locks into place. Same skill, same prompts, 10 generations each. Credit to Peter Wang for the original Scroll World skill open source, now forked with budget tiers and mobile fixes. Soul built 4 scenes. Fable built 1 film.

Spike 1%

45,609 Aufrufe • vor 2 Monaten

As I promised yesterday, I'll briefly explain LoRA training and share a workflow I made so you can do it quickly. First, let me answer a very common question: 'Why train LoRAs when we have such advanced models?' Even though we have incredibly advanced models now (like NBP), we still can't always get them to do specific things we want. Simplest example: the spritesheet LoRA I made the other day. I generated 1000 images with Nano Banana and only 100 were what I wanted. The LoRA I trained using those 100 images gives me nearly 100% consistent results. Second point is cost and speed. With LoRA, we can cut costs by 4-5x. And while doing that, we're generating 4-5x faster. How many images do you need for a good LoRA? This depends on your LoRA's complexity. For example, when I training the spritesheet LoRA, even though I used 100 images, I didn't include buildings in the training data, so this LoRA doesn't work for buildings. So think about your LoRA's use cases and add examples for as many use cases as possible to improve quality. What are paired images and how to train LoRAs for image-editing? When training LoRAs for image editing on fal, we call each edit example paired images - one with _start suffix, one with _end suffix. For example, if you're training a background remove LoRA, the unedited original photo will be your '_start' image. The image with background removed will be the '_end' image. Simply put: images we want to edit or use as reference get _start, target images we want to achieve get '_end'. Important: save both images with the same name. Like image332_start.jpg and image332_end.jpg. This way the system knows which images pair together. What about training LoRAs for models with multiple image inputs? Same logic. We still use _start and _end suffixes, but with one difference. Since there are multiple input images, we can number them: _start, _start1, _start2. Example: start images, 1st image = Woman portrait (image35_start.jpg) 2nd image = Glasses photo (image35_start1.jpg) 3rd image = Hat photo (image35_start2.jpg) Output image = portrait of woman wearing glasses and hat (image35_end.jpg) Can we do more detailed captioning? Yes. Similarly, you can improve training quality by creating a txt file for each set with the caption inside. Example: create image35.txt and write: 'Recreate the image by putting the glasses from the second image and the hat from the third image on the woman in the first image.' What are Steps? How many should I use? What's Learning Rate? Steps determines how many times the model sees and processes your training data (your images). Each step, the model learns a bit more. But as steps increase, so does the risk of overfitting. So there's no real default. But for a simpler LoRA with 20 paired images, 1000 steps is ideal. Here's a metaphor for the Steps and Learning Rate relationship: Imagine you have a balloon. Our goal is to inflate it to the optimal size. Steps = How many times we blow into the balloon Learning rate = How hard we blow each time If we blow too softly, we need to blow many more times. If we blow too hard, we risk popping it quickly and can't reach optimal size. Of course training won't explode, but it won't work as intended because it wasn't trained optimally. Training's done, now what? Once training's complete, you'll have a safetensors file. Every model you train on fal has a LoRA inference endpoint. In that inference, add your safetensors file link to the LoRA url input, and you can use your LoRA. Thanks for the read! The workflow in the video: If I forgot anything, let me know in the replies.

ilker

15,192 Aufrufe • vor 8 Monaten

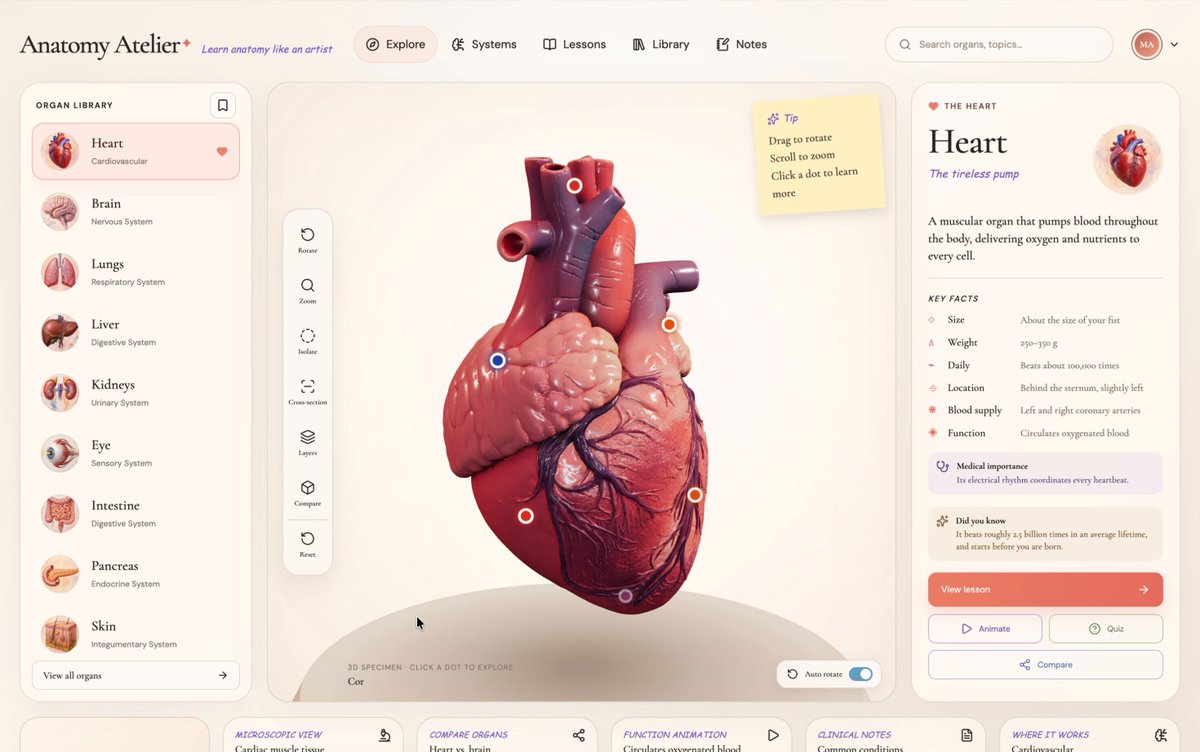
Only if education could be this interactive ❤️‍🔥 I've had a looong wish to build something genuinely useful through vibe coding, and I finally did it. A 3D human anatomy application built with Three.js using GPT 5.6 Sol. It all started with a single design image that I created using GPT Image 2.0. I then used it to generate every 3D organ image, one by one. Next, I converted each of those images into 3D models using Tripo (and no, they didn't sponsor this 😄). After that, I opened Codex, wrote a master prompt based on the design, and gave it the prompt, the design image, and all the 3D models. Codex built the first version beautifully, but there was one big problem. Every single 3D model was nearly 120-150 MB. That obviously wasn't practical for the web and was giving a performance of 16fps. After a few iterations, Codex optimized each model down to roughly 2–5.5 MB while preserving the visual quality, reducing the total asset size from ~900 MB to just 28.6 MB. And each model loads on demand. Along the way, Codex also generated those anatomical illustrations showing where each organ sits in the human body, and even created the interactive hotspot markers that explain different parts of every organ. It handled all of that. The process wasn't exactly one shot, but it also wasn't difficult. You just have to do it step by step. It genuinely felt like building something that could make learning anatomy much more engaging. The inspiration came from Dilum Sanjaya's 3D animal plant cell project. I remember seeing it and thinking, "I want to build something like this one day." And I did it :D Live: Code:

The Bugged Dev

2,103,380 Aufrufe • vor 1 Monat

I got this custom scorpion rigged, animated and running in my game in one full day with AI. GPT-6 built the entire rig. My part was preparing the model and motion references, then giving feedback. After trying a few approaches, I found a workflow that worked: 1. Give it a model that makes sense. I generated the model with Tripo P2.0, then cleaned it up myself. Low-poly, optimized, split into logical parts. I think that preparation mattered a lot. GPT-6 works on the mesh through code. A manageable vertex count and sensible parts give it a clearer starting point for bone placement and skinning. 2. Show it the movement you want. I took a reference image of the character and used Seedance to generate side-view animation videos. I decided which animations the game needed and selected the takes with the movements I liked. Then I gave GPT-6 the model, the videos and that animation list. There was no existing rig to start from. 3. Compare the animation frame by frame. This was the idea I wanted to test: ask GPT-6 to compare its Blender animation against the reference video frame by frame, from the same view. That gave it concrete poses and timing to work toward. I could point to where the feet should be planted or when the tail should strike. 4. Expect to give feedback. A generated run can look like hopping. An attack can start with a jump you never wanted. Choosing the references matters, and a side view still leaves depth and hidden legs to figure out. It took several iterations. I explained what looked wrong and how I wanted it to move, and GPT-6 kept refining the animation. Once the walk worked, I also had it create left and right strafe animations procedurally from that walk. Those didn't need their own reference videos. By the end of the day, the creature was in Unity. I've recorded the full workflow, including the Blender setup and feedback process:

Stefan 3D AI

12,563 Aufrufe • vor 10 Tagen

i built a way to make full ai films with seedance 2.5 + higgsfield without shooting a single frame in real life you start with a screenplay, a treatment, or even just an idea and it gives you an actual production plan: scenes, shots, character references, locations, dialogue, b-roll, sound, captions, everything you need to turn it into a finished film this was supposed to stay internal but f*ck it, i’m sharing the whole workflow here’s how it works: the script gets broken down scene by scene, then every scene gets turned into a proper shot list with prompts that account for character continuity, wardrobe, lighting, locations, camera movement, pacing, and what needs to happen before and after that shot those prompts get run through seedance 2.5, using reference assets and longer generations to keep the film feeling like one world instead of a thousand random ai clips stitched together then the footage gets assembled with voice, sound design, music, dialogue, captions, and transitions into an actual watchable film the whole system is built to take you from script to a finished film seedance 2.5 is coming soon on higgsfield, but i’m sharing the full breakdown before it so you can be prepared: the script-to-scene system that turns a screenplay into a real production plan seedance 2.5 prompt setup for cinematic shots and consistent characters the reference-asset workflow for keeping faces, wardrobe, locations, and visual style locked in the editing, voice, sound, and caption workflow that turns generated clips into a finished movie RT + reply “FILM” and (i’ll send it over must follow so i can dm)

Sulfur

49,001 Aufrufe • vor 1 Monat

EPISODE 1- FINAL REPLAY Was their love story built on a lie? The championship was over, but the biggest betrayal was just beginning. Made with Nano Banana 2 + Seedance 2.0 on RoboNeo prompt Style: Ultra-cinematic drama, premium streaming-series aesthetics, photorealistic visuals, anamorphic framing, shallow depth of field, luxurious golden ballroom lighting with dramatic shadows, subtle facial acting, slow deliberate camera moves, emotional orchestral score swelling with tension. GRAND GALA BALLROOM – NIGHT 0–5s | Recall & Re-hook Freeze frame from Episode Zero lingers on the brunette’s @[Image 2](image_2) knowing smile as she lowers her wine glass. The giant replay screen behind her flashes blinding white. Hard cut to black. A single heartbeat sound. The replay screen bursts to life — but instead of football highlights, it shows intimate, hidden footage: the football champion @[Image 4](image_4) and the elegant dark-haired brunette @[Image 2](image_2) in a passionate embrace in a private locker room, his winner’s medal still around his neck. The crowd in the ballroom gasps audibly. 5–12s | Consequence Cut to the blonde woman @[Image 3](image_3) at the elegant table. Her face drains of color as she stares at the massive screen. Tears well up again. She picks up her engagement ring from the table in her bare hand and clutches it so tightly it digs into her right hand. The football champion @[Image 4](image_4)(still in black suit, medal now missing from his neck) stands frozen a few feet away, horror dawning on his face. He (medal now missing from his neck) turns toward the screen, then desperately toward the blonde. Blonde woman (whispering, broken): “You said it was only the match that changed everything…” The blonde @[Image 2](image_2) walks away abruptly, knocking over a champagne flute. It shatters loudly on the marble floor — the sound cutting through the now-hushed ballroom. She looks between the champion @[Image 3](image_3) and the brunette @[Image 1](image_1), betrayal turning to cold fury. Blonde woman @[Image 2](image_2)(voice cracking but gaining strength): “Then why does the final replay show you celebrating with her… while I waited for you?” The replay screen loops the damning embrace in slow motion. Guests murmur and film with their phones. 27–30s | Next Cliffhanger The brunette @[Image 1](image_1) smiles wider, turns, and begins walking away through the crowd as the replay screen suddenly cuts to new unseen footage — a close-up of the brunette @[Image 1](image_1) slipping something into the champion’s drink earlier that night, followed by a quick flash of a mysterious document with official-looking seals. The champion’s face twists in shock and realization. The blonde’s eyes widen in horror as she sees it too. Freeze frame on the three of them — triangle of tension. Text on screen fades in: EPISODE TWO Fade to black. Distant crowd applause mixes with a rising, ominous orchestral sting.

Sharon Riley

68,710 Aufrufe • vor 2 Monaten

Probably I vibe coded a lil startup here? 😭 It has been such a loooong wish of mine to build some kind of 3D experience where I could customize a T-shirt in literally any way possible and it’s finally here. Built with Three.js using GPT 6 Astra, this is a full 3D T-shirt customization studio where you can visualize and customize a realistic shirt directly in the browser. That T-shirt itself was modeled by Astra using Tripo right inside Codex through Tripo Plugin. And you can pretty much do anything with it. You can paint directly on any side of the shirt using different brushes and colors, or even spray paint it in real time just like you would spray on a wall. There are also stickers generated using GPT Image 2.5 that you can place anywhere on the T-shirt, resize, reposition, recolor, layer, and customize however you want. On top of that, there’s support for things like fabric customization, sizing, layers, colors, and even wind simulation to push the realism a little further. Once you’re done, you can export the entire design as a 3D view or export individual images of the T-shirt so you could technically take the design, print it, and maybe even sell it. One of my favorite parts is how the spray painting effect works directly on the 3D T-shirt in real time. I also loved seeing how Astra managed to keep the whole experience performant across devices using a custom BVH implementation along with several CPU side optimizations. And the process of building it was super simple. I generated the initial studio design using GPT Image 2.5, gave that image to Astra with the Tripo Plugin enabled, and it basically handled everything from there. I didn’t have to separately generate a 3D reference, upload it to Tripo, download the asset, give it back to Astra, or manually coordinate any of that. Astra handled the entire flow on its own without needing any additional input from me. Really happy with both the process and how the final result turned out. Live:

The Bugged Dev

51,942 Aufrufe • vor 12 Tagen